¶ Wiring guide
A single, readable reference of every component's current switch/coil pin assignments and
bring-up status — board map, known-component wiring tables, LEDs, known gaps, and harness
diagrams, in one place. Generated by tools/hw_console/generate_docs.py from
tools/hw_console/data/components.yaml and machinefolder/config/hardware-*.yaml — do not
hand-edit this file, it will be overwritten. For the step-by-step printable bench-test checklist
(what's been tested, when, pulse-ms tuning notes, pass/fail history), see the companion
print/wiring-guide.html — open that one directly in a browser or print it
at the bench; it's kept separate on purpose so there's exactly one place that fast-changing log
gets updated, not two drifting copies.
This is a snapshot, not the source of truth. If it and another file disagree, the other file
wins:
- Real MPF pin numbers:
machinefolder/config/hardware-switches.yaml/hardware-coils.yaml/
hardware-leds.yaml/hardware-devices.yaml. - Bring-up status, checklists, and the full history/notes behind each number (swaps, test
results, root causes):tools/hw_console/data/components.yaml. - The rules for picking a number in the first place (board priority, pairing rules, HV bank
wiring): OPP hardware reference. - The step-by-step physical bring-up checklist:
print/wiring-guide.html.
Generated: 2026-11-04.
¶ Board map
Six physical CPU boards across three USB-serial chains. This machine is being rewired from
scratch — board assignment follows a fixed priority: CobraPin first (chain 0, then chain 1), the
red PSOC boards (chain 2) only as a fallback when CobraPin can't fit something, and every LED
goes on CobraPin, no exceptions. See OPP hardware reference for
the full rulebook — bank/HV-feed wiring, the red-board pairing rules, and why the two families
follow different numbering. Counts below are real, derived from hardware-switches.yaml /
hardware-coils.yaml / hardware-leds.yaml — remaining free capacity per board isn't tracked as
structured data anywhere in this repo (see board Overviews.xlsx or physical inspection for
that).
| Board | Port | Role | Switches in use | Coils in use | Reserved (off-limits) | LEDs in use |
|---|---|---|---|---|---|---|
| Chain 0 / Board 0x20 (CobraPin) | COM4 | cobrapin-switches-coils-leds | 8 | 7 | 4 | 40 |
| Chain 1 / Board 0x20 (CobraPin) | COM5 | cobrapin-switches-coils-leds | 0 | 0 | 0 | 0 |
| Chain 2 / Board 0x20 (PSOC card 0) | COM6 | psoc-switches-coils | 12 | 0 | 0 | 0 |
| Chain 2 / Board 0x21 (PSOC card 1) | COM6 | psoc-switches-coils | 0 | 0 | 0 | 0 |
| Chain 2 / Board 0x22 (PSOC card 2, incl. incandescent card) | COM6 | psoc-switches-coils-incand | 0 | 0 | 0 | 0 |
| Chain 2 / Board 0x23 (PSOC card 3) | COM6 | psoc-switches-coils | 0 | 0 | 0 | 0 |
¶ Components
One row per switch/coil pin — Component and Status are shown only on a group's first row.
Status summarizes the component's parallel status flags (registry.STATUS_FLAGS): how many
are done (n/a counts as done) and the first one still open, in build order —
Obtained · Restored & cleaned · Wires & plug · On playfield · Lights fitted · Wired to controls · In hardware config · Bench-tested · Story function · In game code · Tested in game.
The full per-flag breakdown is in the hw_console Status table. Pin Silk Screen
is blank when not yet confirmed against a real board/photo; Other Pin is GND for every switch,
or a CobraPin coil's HV bank feed (HV-A/HV-B/HV-C) — blank for a red-board coil, since
none is wired yet.
| Component | Switches & Coils | Type | Board | Pin Silk Screen | Other Pin | MPF | Status |
|---|---|---|---|---|---|---|---|
| Sling left (autofire) | s-sling-left | Switch | chain0-0x20 | 0-0-19 | GND | 0-0-19 | 10/11 · next: Tested in game |
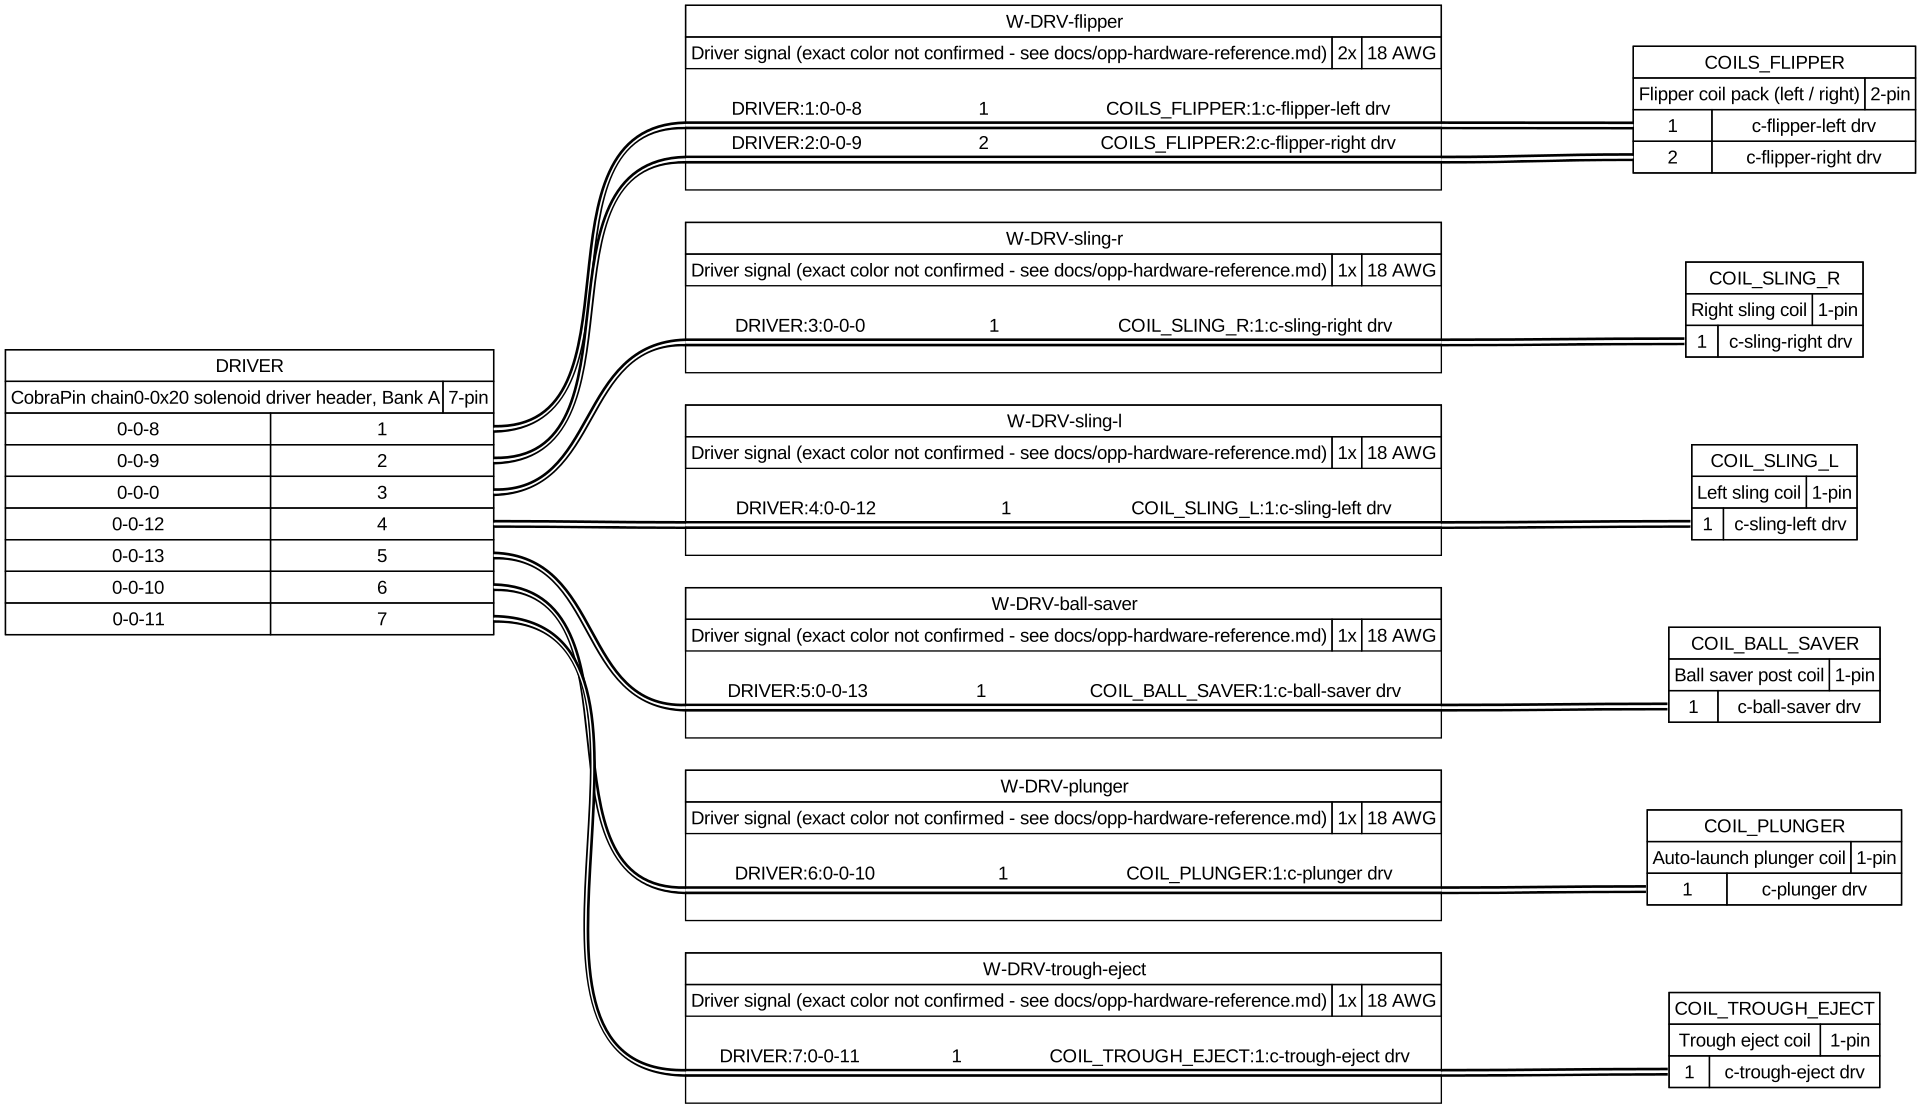
| c-sling-left | Coil | chain0-0x20 | 0-0-12 | HV-A | 0-0-12 | ||
| Sling right (autofire) | s-sling-right | Switch | chain0-0x20 | 0-0-25 | GND | 0-0-25 | 10/11 · next: Tested in game |
| c-sling-right | Coil | chain0-0x20 | 0-0-0 | HV-A | 0-0-0 | ||
| Ball saver post (between the flippers) | s-ball-saver | Switch | chain0-0x20 | 0-0-24 | GND | 0-0-24 | 7/11 · next: Lights fitted |
| c-ball-saver | Coil | chain0-0x20 | 0-0-13 | HV-A | 0-0-13 | ||
| Kickback ball saver (leftmost bottom lane) | c-kickback | Coil | — | — | 4/11 · next: On playfield | ||
| Pop bumper 1 (autofire) | s-popbumper-1 | Switch | — | — | 4/11 · next: Wires & plug | ||
| c-popbumper-1 | Coil | — | — | ||||
| Pop bumper 2 (autofire) | s-popbumper-2 | Switch | — | — | 4/11 · next: Wires & plug | ||
| c-popbumper-2 | Coil | — | — | ||||
| Pop bumper 3 (autofire) | s-popbumper-3 | Switch | — | — | 4/11 · next: Wires & plug | ||
| c-popbumper-3 | Coil | — | — | ||||
| Plunger lane / auto-launch | s-plunger-lane | Switch | chain0-0x20 | 0-0-26 | GND | 0-0-26 | 10/11 · next: Tested in game |
| c-plunger | Coil | chain0-0x20 | 0-0-10 | HV-A | 0-0-10 | ||
| Launch-lane diverter (ball dropper feeder, idea) | c-launch-diverter | Coil | — | — | 2/11 · next: Obtained | ||
| Ball trough | s-trough1 | Switch | chain2-0x20 | 3.1 | GND | 2-0-22 | 7/11 · next: Wires & plug |
| s-trough2 | Switch | chain2-0x20 | 3.7 | GND | 2-0-16 | ||
| s-trough3 | Switch | chain2-0x20 | 3.6 | GND | 2-0-17 | ||
| s-trough4 | Switch | chain2-0x20 | 3.5 | GND | 2-0-18 | ||
| s-trough5 | Switch | chain2-0x20 | 3.4 | GND | 2-0-19 | ||
| s-trough6 | Switch | chain2-0x20 | 3.3 | GND | 2-0-20 | ||
| s-trough-jam | Switch | chain2-0x20 | 3.2 | GND | 2-0-21 | ||
| c-trough-eject | Coil | chain0-0x20 | 0-0-11 | HV-A | 0-0-11 | ||
| Start button (cabinet) | s-start | Switch | chain0-0x20 | 0-0-27 | GND | 0-0-27 | 10/11 · next: Tested in game |
| Launch button (cabinet) | s-launch | Switch | chain0-0x20 | 0-0-3 | GND | 0-0-3 | 10/11 · next: Tested in game |
| Era select button (cabinet, next to Start) | s-era-select | Switch | — | — | 1/11 · next: Obtained | ||
| Co-op button (cabinet, idea) | s-coop | Switch | — | — | 1/11 · next: Obtained | ||
| Drop target bank (3) - exit turret | s-drop1 | Switch | — | — | 6/11 · next: On playfield | ||
| s-drop2 | Switch | — | — | ||||
| s-drop3 | Switch | — | — | ||||
| c-drop | Coil | — | — | ||||
| Exit ball lock (behind the turret drop bank) | s-exit-success | Switch | — | — | 3/11 · next: Restored & cleaned | ||
| Knock-down coil on a turret-bank target (idea) | c-drop-knockdown | Coil | — | — | 2/11 · next: Obtained | ||
| Single drop target | s-drop-single | Switch | — | — | 6/11 · next: On playfield | ||
| c-drop-single | Coil | — | — | ||||
| Top lane 1 | s-toplane1 | Switch | — | — | 7/11 · next: Wired to controls | ||
| Top lane 2 | s-toplane2 | Switch | — | — | 7/11 · next: Wired to controls | ||
| Top lane 3 | s-toplane3 | Switch | — | — | 7/11 · next: Wired to controls | ||
| Bottom lane 1 (right outlane) | s-bottomlane1 | Switch | chain2-0x20 | 2.4 | GND | 2-0-27 | 10/11 · next: Tested in game |
| Bottom lane 2 (right inlane) | s-bottomlane2 | Switch | chain2-0x20 | 2.3 | GND | 2-0-28 | 10/11 · next: Tested in game |
| Bottom lane 3 (left inlane) | s-bottomlane3 | Switch | chain2-0x20 | 2.0 | GND | 2-0-31 | 10/11 · next: Tested in game |
| Bottom lane 4 (left outlane) | s-bottomlane4 | Switch | chain2-0x20 | 2.1 | GND | 2-0-30 | 10/11 · next: Tested in game |
| Big rollover button (playfield) | s-button | Switch | chain2-0x20 | 2.2 | GND | 2-0-29 | 9/11 · next: Lights fitted |
| Orbit left | s-orbit-l | Switch | — | — | 5/11 · next: On playfield | ||
| Orbit right | s-orbit-r | Switch | — | — | 5/11 · next: On playfield | ||
| Spinner (just after the left orbit entry) | s-spin1 | Switch | — | — | 5/11 · next: On playfield | ||
| Pop-up post (top of orbit) | c-up1 | Coil | — | — | 6/11 · next: Wired to controls | ||
| Pop-up post (powered up, PWM hold) | c-up2 | Coil | — | — | 5/11 · next: On playfield | ||
| Pull-down post between the pop bumpers (Orange Portal pre-load) | s-up3 | Switch | — | — | 4/11 · next: On playfield | ||
| c-up3-drop | Coil | — | — | ||||
| c-up3-hold | Coil | — | — | ||||
| VUK1 ball lock (vertical upkicker) | s-vuk1 | Switch | — | — | 3/11 · next: Wires & plug | ||
| c-vuk1 | Coil | — | — | ||||
| VUK2 ball lock (vertical upkicker) | s-vuk2 | Switch | — | — | 4/11 · next: On playfield | ||
| c-vuk2 | Coil | — | — | ||||
| VUK3 ball lock (vertical upkicker) | s-vuk3 | Switch | — | — | 4/11 · next: On playfield | ||
| c-vuk3 | Coil | — | — | ||||
| VUK4 ball lock (vertical upkicker) | s-vuk4 | Switch | — | — | 3/11 · next: Wires & plug | ||
| c-vuk4 | Coil | — | — | ||||
| VUK5 ball lock (vertical upkicker) | c-vuk5 | Coil | — | — | 4/11 · next: On playfield | ||
| VUK7 ball lock (vertical upkicker) | c-vuk7 | Coil | — | — | 2/11 · next: Restored & cleaned | ||
| VUK8 ball lock (vertical upkicker) | c-vuk8 | Coil | — | — | 2/11 · next: Restored & cleaned | ||
| Drop-down post (powered down, PWM hold) | c-up4 | Coil | — | — | 3/11 · next: Restored & cleaned | ||
| Incinerator ball lock (to be built) | s-insinerator | Switch | — | — | 2/11 · next: Obtained | ||
| Pull-down coil (spare mechanism) | c-pulldown | Coil | — | — | 2/11 · next: Restored & cleaned | ||
| Standup target 1 | s-target1 | Switch | — | — | 5/11 · next: Wires & plug | ||
| Standup target 2 | s-target2 | Switch | — | — | 5/11 · next: Wires & plug | ||
| Standup target 3 | s-target3 | Switch | — | — | 5/11 · next: Wires & plug | ||
| Standup target 4 | s-target4 | Switch | — | — | 5/11 · next: Wires & plug | ||
| Standup target 5 | s-target5 | Switch | — | — | 5/11 · next: Wires & plug | ||
| Standup target 6 | s-target6 | Switch | — | — | 5/11 · next: Wires & plug | ||
| Standup target 7 | s-target7 | Switch | — | — | 5/11 · next: Wires & plug | ||
| Left ramp opto - just before the top | s-ramp-l1 | Switch | — | — | 2/11 · next: Restored & cleaned | ||
| Left ramp opto - just after the top | s-ramp-l2 | Switch | — | — | 2/11 · next: Restored & cleaned | ||
| Right ramp - top room entry opto (just before the top) | s-ramp-r1 | Switch | — | — | 2/11 · next: Restored & cleaned | ||
| Right ramp - top room exit opto (just past the top) | s-ramp-r2 | Switch | — | — | 2/11 · next: Restored & cleaned | ||
| Diverter (to the ball dropper) | c-ramp-diverter | Coil | — | — | 7/11 · next: Wired to controls | ||
| VUK6 ball lock (upkicker into the box) | s-vuk6 | Switch | — | — | 7/11 · next: Wired to controls | ||
| c-vuk6 | Coil | — | — | ||||
| Aerial Faith Plate launcher - ball switch | s-aerial | Switch | — | — | 3/11 · next: Restored & cleaned | ||
| Pedestal button target (Faith Plate platform) | s-pedestal | Switch | — | — | 2/11 · next: Obtained | ||
| Left flipper | s-flipper-left | Switch | chain0-0x20 | 0-0-1 | GND | 0-0-1 | 10/11 · next: Tested in game |
| c-flipper-left | Coil | chain0-0x20 | 0-0-8 | HV-A | 0-0-8 | ||
| Right flipper | s-flipper-right | Switch | chain0-0x20 | 0-0-2 | GND | 0-0-2 | 10/11 · next: Tested in game |
| c-flipper-right | Coil | chain0-0x20 | 0-0-9 | HV-A | 0-0-9 | ||
| Mid flipper (next to the pop bumpers) | c-flipper-mid | Coil | — | — | 4/11 · next: On playfield | ||
| Service button - Enter | sw_service_enter | Switch | — | — | 2/11 · next: Obtained | ||
| Service button - Escape | sw_service_esc | Switch | — | — | 2/11 · next: Obtained | ||
| Service button - Up (+) | sw_service_up | Switch | — | — | 2/11 · next: Obtained | ||
| Service button - Down (-) | sw_service_down | Switch | — | — | 2/11 · next: Obtained | ||
| Playfield magnet (idea) | s-magnet | Switch | — | — | 2/11 · next: Obtained | ||
| c-magnet | Coil | — | — | ||||
| Shaker motor (idea) | c-shaker | Coil | — | — | 2/11 · next: Obtained | ||
| Tilt plumb bob (idea) | s-tilt | Switch | — | — | 2/11 · next: Obtained | ||
| Slam tilt switch (idea) | s-slam-tilt | Switch | — | — | 2/11 · next: Obtained | ||
| Hidden ball sensor in a side panel (idea) | s-hidden-side | Switch | — | — | 1/11 · next: Obtained | ||
| Ideas only - not in the story, the review or the build yet | |||||||
| 2nd launch-lane diverter (portal feeder, idea) | c-launch-diverter-2 | Coil | — | — | 1/11 · next: Obtained | ||
| Diverter at the top of the orbit (portal loader, idea) | c-orbit-diverter | Coil | — | — | 1/11 · next: Obtained | ||
| High post at the Excursion Funnel's exit (idea) | c-funnel-post | Coil | — | — | 1/11 · next: Obtained | ||
| Moving-panel ramp (idea) | c-panel-ramp-post | Coil | — | — | 0/11 · next: Obtained |
Full history/notes (test results, swaps found during bring-up, root causes, open questions) live
per-component in tools/hw_console/data/components.yaml — this table only carries the current
numbers and a one-line status, not the story behind them.
¶ Lights
All LEDs are on Cobra chain 0 (0-0-0…0-0-39, grb), per the project's
board-priority policy (lights always go on CobraPin). Individual LED names/numbers aren't tracked
in components.yaml — see machinefolder/config/hardware-leds.yaml for the full list.
¶ Known gaps
Components whose notes flag an explicit GAP: in components.yaml — see TODO for full
detail and status:
¶ Harness diagrams
Cable diagrams rendered by WireViz from
tools/hw_console/data/harnesses/*.yaml — see that directory for the source data, and
OPP hardware reference for the underlying bank/HV-feed/wire-color
rules each one is built from.
¶ Bank A
Generated by tools/hw_console/generate_docs.py from tools/hw_console/data/components.yaml
and machinefolder/config/hardware-*.yaml (board map, components), plus
tools/hw_console/data/harnesses/*.yaml via WireViz (harness diagrams). If a component's wiring
status changes, update components.yaml (or the hw_console web UI) first, then re-run the
generator to match. New component wiring should follow
.claude/skills/wire-component/SKILL.md's process so this page, the registry, and the config all
stay in sync.